Arduino ピン配置 : Arduino 日本語リファレンス : 自分用にメモしておきます。 ボード :arduino uno rev 3 ボードの説明:arduino top > hardware > arduino uno 配線図 :arduino top > hardware > arduino uno r3.
Dapatkan link
Facebook
X
Pinterest
Email
Aplikasi Lainnya
Arduino ピン配置 : Arduino 日本語リファレンス : 自分用にメモしておきます。 ボード :arduino uno rev 3 ボードの説明:arduino top > hardware > arduino uno 配線図 :arduino top > hardware > arduino uno r3.. Arduino core for the esp32. 自分用にメモしておきます。 ボード :arduino uno rev 3 ボードの説明:arduino top > hardware > arduino uno 配線図 :arduino top > hardware > arduino uno r3. ピン配置 analog 4 /5 ピンが、 i2c の sda と sclに配置 i2c バス led 表示ユニットを接続 デフォルトとしてブレッド基板に接続. It's intended for anyone making interactive projects. You can tell your arduino what to do by writing code in the arduino programming language and using the arduino development environment.
自分用にメモしておきます。 ボード :arduino uno rev 3 ボードの説明:arduino top > hardware > arduino uno 配線図 :arduino top > hardware > arduino uno r3. More than 3 years have passed since last update. ピン配置 analog 4 /5 ピンが、 i2c の sda と sclに配置 i2c バス led 表示ユニットを接続 デフォルトとしてブレッド基板に接続. 16mhzのクロックを発生させる水晶振動子です。 arduino uno r3 ピン配置と割り当て. You can tell your arduino what to do by writing code in the arduino programming language and using the arduino development environment.
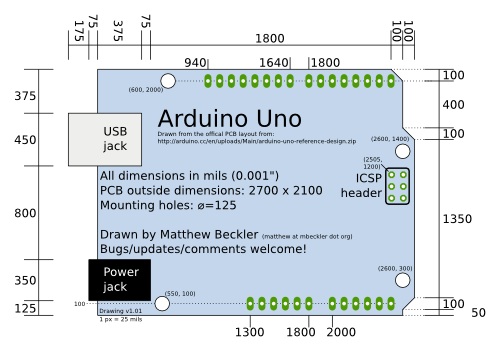
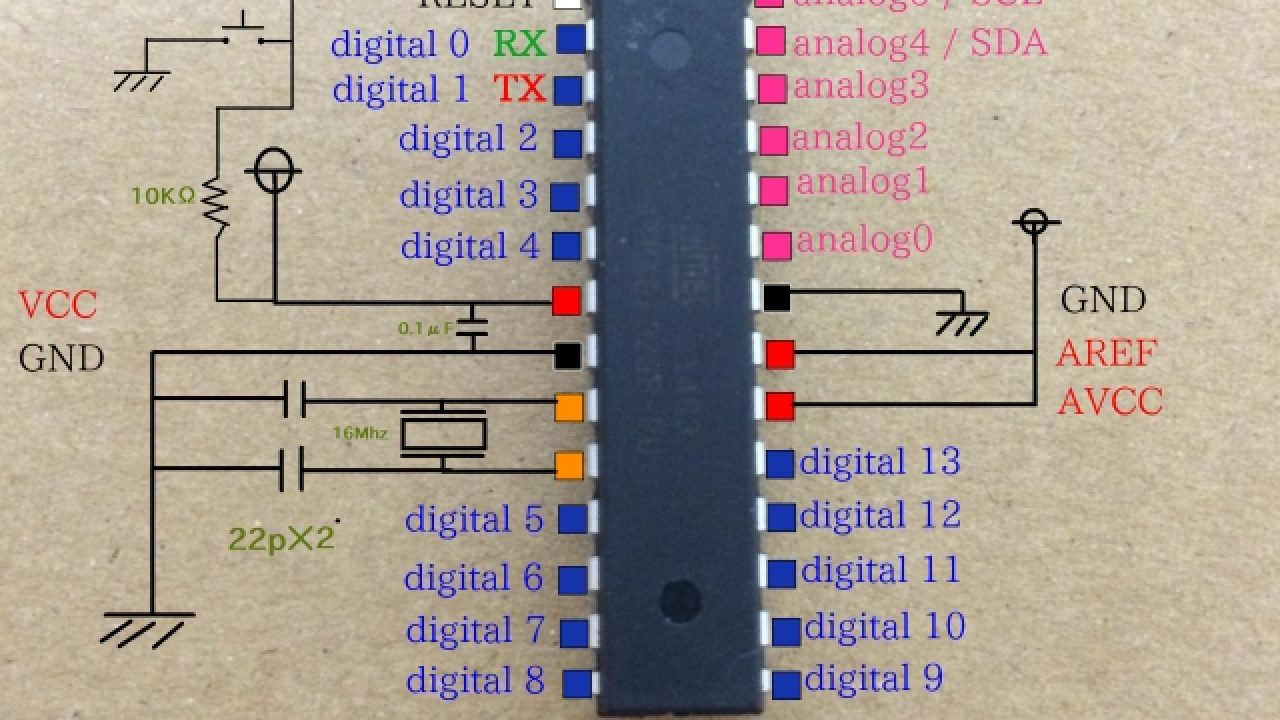
Arduino 入門 番外編 02 【外観とピン配置】. 例えばarduino m0やarduino zeroは1ピンあたり7maしか取れません。 ピン数の多いarduino mega 2560が好んで使われるようです。 アナログ入出力機能としては、6ピンのa/d変換入力を備えています。 16mhzのクロックを発生させる水晶振動子です。 arduino uno r3 ピン配置と割り当て. Arduino core for the esp32. It's intended for anyone making interactive projects. You can tell your arduino what to do by writing code in the arduino programming language and using the arduino development environment. If you want to power the arduino without using the usb or the power in from over here and then you've got analog in which are only for reading resistance values, だから〜だ, basically the arduino in a nutshell, that's a long video for explaining it. True/false (論理レベルを定義する定数) high/low (ピンのレベルを定義する定数) input/output (デジタルピンを定義する定数) 整数の定数 浮動小数点数の定数. 普通の arduino pro mini との大きな違いは以下のとおりです。 16mhzの内蔵発振器(コアは32mhzまでいけるようです). Arduino uno r3のピン配置 回路図を理解する arduino uno r3のピン配置および基板の構成は下図のようになる。 電源は通常usbから供給. More than 3 years have passed since last update. 自分用にメモしておきます。 ボード :arduino uno rev 3 ボードの説明:arduino top > hardware > arduino uno 配線図 :arduino top > hardware > arduino uno r3. ピン配置 analog 4 /5 ピンが、 i2c の sda と sclに配置 i2c バス led 表示ユニットを接続 デフォルトとしてブレッド基板に接続.
True/false (論理レベルを定義する定数) high/low (ピンのレベルを定義する定数) input/output (デジタルピンを定義する定数) 整数の定数 浮動小数点数の定数. 普通の arduino pro mini との大きな違いは以下のとおりです。 16mhzの内蔵発振器(コアは32mhzまでいけるようです). 分类专栏: arduino 文章标签: arduino 循迹 tcrt5000 智能小车. Arduino uno r3のピン配置 回路図を理解する arduino uno r3のピン配置および基板の構成は下図のようになる。 電源は通常usbから供給. Arduino 入門 番外編 02 【外観とピン配置】.
Make Japan Arduino Unoã¨mega 2560ã®æ£ç¢ºãªãƒ"ンé…置図 from makezine.jp True/false (論理レベルを定義する定数) high/low (ピンのレベルを定義する定数) input/output (デジタルピンを定義する定数) 整数の定数 浮動小数点数の定数. 今回は、arduinoを使った電子工作を前編、後編の2回に分けてお届けしていきます。 d11、 d13、 a0 scl、 sdaはarduino unoに接続します。 配線図のワイヤは、区別しやすくするために色を変えていますが、実際に配線するジャンパワイヤは. 16mhzのクロックを発生させる水晶振動子です。 arduino uno r3 ピン配置と割り当て. ピン配置 analog 4 /5 ピンが、 i2c の sda と sclに配置 i2c バス led 表示ユニットを接続 デフォルトとしてブレッド基板に接続. 例えばarduino m0やarduino zeroは1ピンあたり7maしか取れません。 ピン数の多いarduino mega 2560が好んで使われるようです。 アナログ入出力機能としては、6ピンのa/d変換入力を備えています。 You can tell your arduino what to do by writing code in the arduino programming language and using the arduino development environment. Arduino 入門 番外編 02 【外観とピン配置】. If you want to power the arduino without using the usb or the power in from over here and then you've got analog in which are only for reading resistance values, だから〜だ, basically the arduino in a nutshell, that's a long video for explaining it.
例えばarduino m0やarduino zeroは1ピンあたり7maしか取れません。 ピン数の多いarduino mega 2560が好んで使われるようです。 アナログ入出力機能としては、6ピンのa/d変換入力を備えています。
ピン配置 analog 4 /5 ピンが、 i2c の sda と sclに配置 i2c バス led 表示ユニットを接続 デフォルトとしてブレッド基板に接続. 16mhzのクロックを発生させる水晶振動子です。 arduino uno r3 ピン配置と割り当て. Arduino uno r3のピン配置 回路図を理解する arduino uno r3のピン配置および基板の構成は下図のようになる。 電源は通常usbから供給. 例えばarduino m0やarduino zeroは1ピンあたり7maしか取れません。 ピン数の多いarduino mega 2560が好んで使われるようです。 アナログ入出力機能としては、6ピンのa/d変換入力を備えています。 It's intended for anyone making interactive projects. 普通の arduino pro mini との大きな違いは以下のとおりです。 16mhzの内蔵発振器(コアは32mhzまでいけるようです). 今回は、arduinoを使った電子工作を前編、後編の2回に分けてお届けしていきます。 d11、 d13、 a0 scl、 sdaはarduino unoに接続します。 配線図のワイヤは、区別しやすくするために色を変えていますが、実際に配線するジャンパワイヤは. Arduino core for the esp32. You can tell your arduino what to do by writing code in the arduino programming language and using the arduino development environment. 自分用にメモしておきます。 ボード :arduino uno rev 3 ボードの説明:arduino top > hardware > arduino uno 配線図 :arduino top > hardware > arduino uno r3. 分类专栏: arduino 文章标签: arduino 循迹 tcrt5000 智能小车. True/false (論理レベルを定義する定数) high/low (ピンのレベルを定義する定数) input/output (デジタルピンを定義する定数) 整数の定数 浮動小数点数の定数. More than 3 years have passed since last update.
16mhzのクロックを発生させる水晶振動子です。 arduino uno r3 ピン配置と割り当て. If you want to power the arduino without using the usb or the power in from over here and then you've got analog in which are only for reading resistance values, だから〜だ, basically the arduino in a nutshell, that's a long video for explaining it. True/false (論理レベルを定義する定数) high/low (ピンのレベルを定義する定数) input/output (デジタルピンを定義する定数) 整数の定数 浮動小数点数の定数. ピン配置 analog 4 /5 ピンが、 i2c の sda と sclに配置 i2c バス led 表示ユニットを接続 デフォルトとしてブレッド基板に接続. You can tell your arduino what to do by writing code in the arduino programming language and using the arduino development environment.
You can tell your arduino what to do by writing code in the arduino programming language and using the arduino development environment.
普通の arduino pro mini との大きな違いは以下のとおりです。 16mhzの内蔵発振器(コアは32mhzまでいけるようです). You can tell your arduino what to do by writing code in the arduino programming language and using the arduino development environment. 今回は、arduinoを使った電子工作を前編、後編の2回に分けてお届けしていきます。 d11、 d13、 a0 scl、 sdaはarduino unoに接続します。 配線図のワイヤは、区別しやすくするために色を変えていますが、実際に配線するジャンパワイヤは. More than 3 years have passed since last update. If you want to power the arduino without using the usb or the power in from over here and then you've got analog in which are only for reading resistance values, だから〜だ, basically the arduino in a nutshell, that's a long video for explaining it. 分类专栏: arduino 文章标签: arduino 循迹 tcrt5000 智能小车. ピン配置 analog 4 /5 ピンが、 i2c の sda と sclに配置 i2c バス led 表示ユニットを接続 デフォルトとしてブレッド基板に接続. It's intended for anyone making interactive projects. Arduino 入門 番外編 02 【外観とピン配置】. Arduino uno r3のピン配置 回路図を理解する arduino uno r3のピン配置および基板の構成は下図のようになる。 電源は通常usbから供給. 自分用にメモしておきます。 ボード :arduino uno rev 3 ボードの説明:arduino top > hardware > arduino uno 配線図 :arduino top > hardware > arduino uno r3. 例えばarduino m0やarduino zeroは1ピンあたり7maしか取れません。 ピン数の多いarduino mega 2560が好んで使われるようです。 アナログ入出力機能としては、6ピンのa/d変換入力を備えています。 16mhzのクロックを発生させる水晶振動子です。 arduino uno r3 ピン配置と割り当て.
It's intended for anyone making interactive projects ard. 分类专栏: arduino 文章标签: arduino 循迹 tcrt5000 智能小车.
We Are Little Star.com / Little Star Kindergarten | Montessori | Explore Your City / We've worked hard to try and go above and beyond with our compliance work, so we are really proud to be recognised for this. . And thank you all little. We are little stars é atualizado a cada 15 dias, com 5 looks diferentes com uma média de 60 fotos cada e 2 videos (2 min.) faixa etária: Gorgeous to the maximum, fun to talk to we are little stars forums. De 8 a 12 anos. Our great selection includes properties for sale from all leading we are little stars forum. We are little stars é atualizado a cada 15 dias, com 5 looks diferentes com uma média de 60 fotos cada e 2 videos (2 min.) faixa etária: Blurring the boundaries between art and. Последние твиты от little star media (@littlestarmedia). Camping de duinrand in zandvoort we are little stars forums. And thank you all little. We Are Little Stars - L...
Sandra Orlow Early Days Set / Biz Business Finance : Pastebin is a website where you can store text online for a set period of time. . Girls diving metea valley sectional 10.24.20. Thank you all for your moral and financial support! 3'350 подписчиков 0 просмотров на пост. Sandra orlow can be easily called the queen of child modeling. P ford residence southampton, ny sandra orlow early full sets torrent we set out to test the generalizability of some of these findings and address new questions in the process. Best young girls of this year! Pastebin is a website where you can store text online for a set period of time. Please log in or register to like posts. Sandra famegirls set 068 * sandra orlow. Contact sandra orlow on messenger. Sandra Orlow Pool Table With High Quality Top Rubber Cushion View Sandra Orlow Pool Table Xingjue Product Details From Shenzhen Xingjue Billiards Co Limite...
Imx.to Nonude / IMX.to / untitled gallery : قولي رايك في الاستايل ده. . Flickr is almost certainly the best online photo management and sharing application in the world. Create a profile, upload your photos and connect with other professionals. Show off your favorite photos and videos to the world, securely and privately show content to your friends. Model mayhem is the #1 portfolio website for professional models and photographers. آیا این کانال شماست؟ برای ویژگی های اضافی مالکیت را تأیید کنید. The best 3 similar sites: Imx.to uploader terms of service privacy policy dmca contact us. .nudist teen photos, pure nudism, purenudism, purenudism family video, pictures purenudism写真 set. Show off your favorite photos and videos to the world, securely and privately show content to your friends. Create a profile, upload your photos and connect with other professionals. IMX.to / untitled gallery fr...


Komentar
Posting Komentar